October 18, 2018
How to remove the dust from your Macbook Pro? Video guide and tips.
In this article, we will go over the steps you need to follow to open your Macbook and clean up the dust that’s inside.
Though it might be scary to perform surgery on your Mac, staying with a Mac full of dust can unfortunately reduce its lifespan. Indeed, as dust aggregates, your fans will get cluttered and will cool your system down less effectively. As a result, your Mac can heat up excessively which can lead to damages to several components inside your mac including the battery, the CPU and other critical parts of the computer.
This post isn’t meant to freak you out but rather help you realize that it’s not that hard to clean things up and give your Mac another youth.
I’ve split this post into three main parts.
1. The Gear: What you will need?
2. The Guide: Steps to follow to clean your Macbook
3. The Tips: A few recommendations to wrap tings up
Let’s get started.
1. The Gear: what do you need to clean your Macbook?
First of all you will need a clear desk or table so you don’t lose anything on the way.
Second you will need to get some custom screwdrivers because Apple nicely uses custom screws to seal the devices they make.
You will also need a small brush to handle the fragile parts inside the Macbook.
Finally you will need a tube of compressed air to clean up your fans. The brush itself won’t be good enough to do the job there.
When I performed my own Macbook’s surgery I was in France and I found it surprizingly hard to find the right screwdrivers so I ordred them on Amazon. The pack I got back then isn’t available anymore which sucks because it was all in one: screwdrivers + precision tool + brush.
I found a good alternative with this option which offers just the right screwdrivers + a precision tool and one cleaning cloth but you will need to get the brush and the compressed air separately.
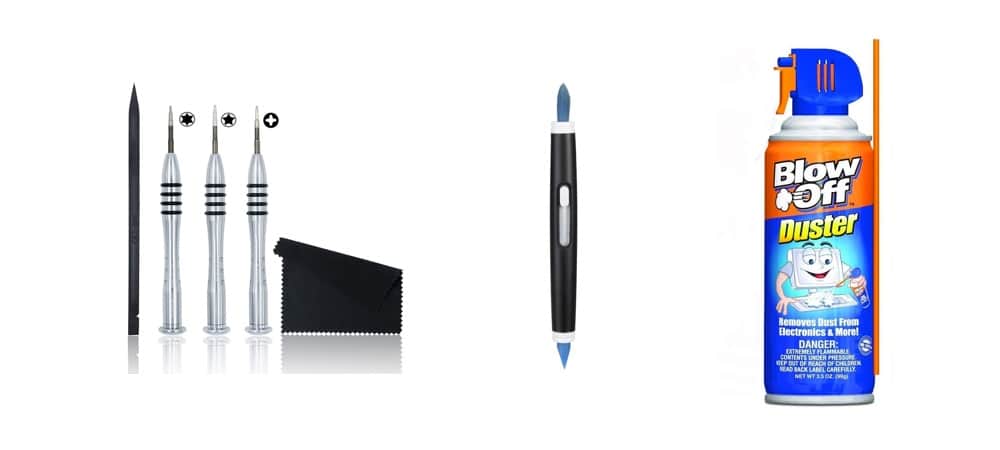
Links for each of these items can be found below:
Set of screwdrivers: Screwdriver Tool Kit Pentalobe Screwdriver for Macbook Air/ Pro and Retina
Brush: OXO Good Grips Electronics Cleaning Brush
Air dust cleaner: Blow Off General Purpose compressed Air Duster Cleaner, MB-111-229 (3.5 oz) 2-pack
Obviously any similar product will work if you find that these aren’t available in your country.
2. The Guide: Steps to follow to clean your Macbook
Step #1: Prepare the surgery block
Obviously your Mac needs to be turned off for this. No sleep mode, turn it off properly and I would say let it sit for a few minutes to let it cool down a bit if you have been using it just before starting this process.
Get a non-slipery material to make sure you Mac doesn’t slide while you are operating it. I used a yoga mat for example but it can be anything.
Step #2: Get your skrewdriver handy, let’s unscrew the beast
If like me, you are rocking a Macbook Pro Retina (mid-2014) or if you have a MacBook Air, grab the precision P5 pentalobe screwdriver from the kit and let’s get started.
It should look like a star as shown below. It looks like a star pretty much.

Be gentle here. You don’t want to break any of these skrews because they will need to be put back in place in a few minutes.
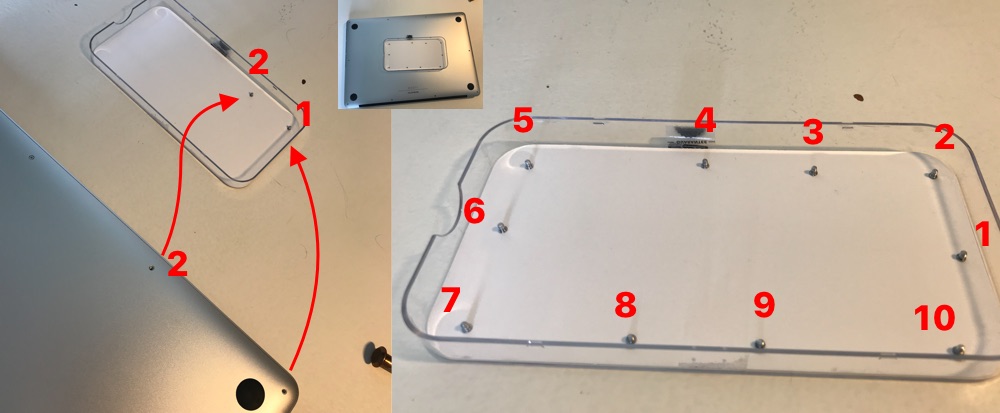
On the MacBook Pro Retina you have 10 screws. I would recommend to remember which screw goes with which hole. My little trick for that was to position them in a little rectangle box as shown on this photo:
Step #3: Open the back cover
This part was super scary but luckily I have a video to show you that if the cover bends a bit and you find it hard to open it’s somehow normal.
Check this 40 sec video to see how it did it. It was my first time so really don’t be scared and just do it.
Step #4: Quick tour of the work to be done
This is how my Mac looked like when I opened it. I did a quick check to see where the dust was and where I should focus on first.
Step #5: Clean the back cover first
I started with the back cover because it’s the simplest to do and also because this way, it’s ready to be put back on the Mac’s body whenever you’re done cleaning the dust from it. You don’t want to leave your Mac open too long.
Step #6: Remove the first layer of dust using the small brush
You can start by removing the dust you see on smaller components using the brush. Again be gentle, you don’t want to damage or unplug anything during that stage.
Step #7: Clean the fans using the compressed air
Time to remove the dust from the fans. This is the most important part because the fans are really key to cool your system down.
I also had to use the precision tool a few times to extract big chunks of dust that would remain stuck in the fan.
Only use short burst of compressed air. Do not maintain the air flow for long period of time as this could damage smaller components.
Step #8: Closing it up
Once you’ve removed all the dust, you just have to reposition everything properly and make sure to use the right screw for the right hole. Technically they should all fit in just fine since you just removed them and you remember where each of them goes.
3. The Tips
- Be careful with static electricity if you just shut the Macbook down before performing this ‘surgery’. Google it if you’re not sure what that means. This is out of scope for this article.
- Make sure the Macbook isn’t pluged to the power when you get started.
- Pay attention to Step 2 and make sure you remember which screw goes where.
- Make sure you screw everything back properly so the macbook stay properly sealed.
- I tend to repeat this operation once a year to keep an Macbook healthy.
Wrapping up
I hope you liked this blog post. If you found it useful, feel free to share it with one other mac users that could benefit from it.
Feel free to reach out if you have any question or feedback on this post, you can find me [on Instagram] (http://www.instagram.com/edouard_iosdev) or on Twitter.
If you want to find out about the apps I built, feel free to check my [portfolio] (http://www.edouardbarbier.com/portfolio/) which can be viewed here.
Til next time, happy learning.
Cheers, Ed